E-Ink Dashboard: Repurposing an Old Kindle Paperwhite with RPi5
Don’t throw away that old Kindle gathering dust in your drawer. With its high-contrast E-ink display and incredible battery life, it is the perfect candidate for a low-power home dashboard. In this post, I’ll show you how I turned a Kindle Paperwhite 2 into a 2-hour refreshing dashboard powered by a Raspberry Pi 5.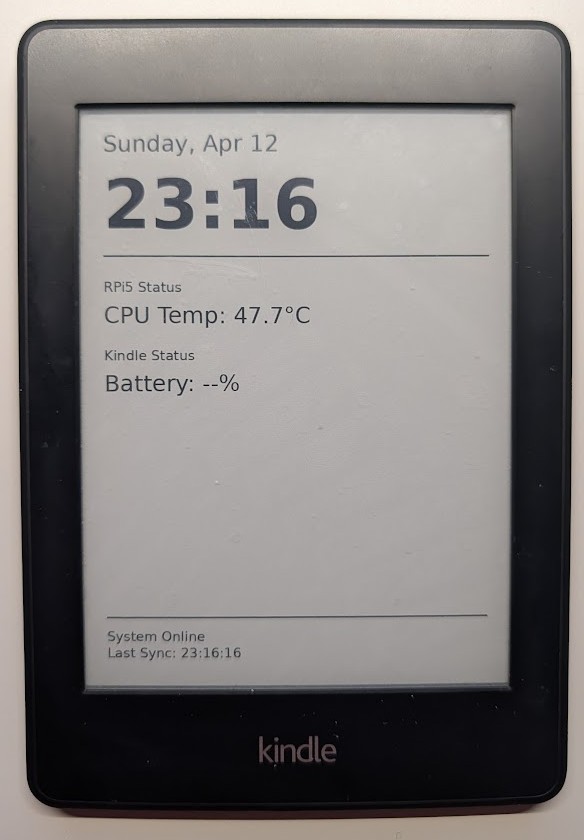
Step 1: Identifying the Hardware
Before you start jailbreaking, you must know exactly which Kindle you have. Firmware and jailbreak methods vary wildly between versions. I used the Kindle Modding Guide to identify my device as a Paperwhite 2 (PW2).
For my specific firmware (5.12.2.2), I used the “WatchThis” jailbreak method.
Step 2: Essential Tools & Safety
Once jailbroken, you need a suite of tools to take control of the Kindle’s Linux internals. You can find the latest “snapshots” of these tools on the MobileRead Forums.
The Toolset:
- KUAL & MRPI: The launcher and package installer
- USBNetwork: To allow SSH access over Wi-Fi.
- renameotabin: This extension renames the internal Over-The-Air (OTA) update binaries. This prevents Amazon from automatically updating the firmware and killing your jailbreak.
Step 3: Gaining SSH Access (The “No-Password” Method)
On newer Kindle firmware like 5.12.2.2, the default root passwords (like mario or fiona) are often disabled. To get in, I used Public Key Authentication. This involves giving the Kindle your RPi5’s “digital fingerprint” so it trusts you automatically.
- Generate a Key on the RPi5:
Run
ssh-keygen -t rsaand thencat ~/.ssh/id_rsa.pubto copy the public key string. - Transfer via USB:
Connect the Kindle to your computer. Navigate to the
usbnet/etc/folder. - Authorized Keys:
Create a file named
authorized_keys(no extension) in that folder and paste the RPi5’s key inside. - Enable SSH over Wi-Fi: Eject the Kindle. Open KUAL, go to USBNetwork, and toggle it to Enabled.
- Connect:
Now, from the RPi5, you can simply run
ssh root@<kindle_ip>without needing a password.
Step 4: The Server Side (RPi5)
The Kindle’s built-in browser is too old for modern web dashboards. Instead, we use an “Image Push” method. The RPi5 handles the heavy lifting by generating a 758x1024 grayscale PNG using Python Pillow (PIL):
from PIL import Image, ImageDraw, ImageFont
import datetime
import subprocess

def get_rpi_temp():
    try:
        out = subprocess.check_output(['vcgencmd', 'measure_temp']).decode('utf-8')
        return out.replace('temp=', '').replace("'C\n", "°C")
    except:
        return "N/A"

def create_dashboard():
    # Kindle PW2 Resolution
    width, height = 758, 1024
    img = Image.new('L', (width, height), 255) # White background
    draw = ImageDraw.Draw(img)

    # Font Setup (Fallback to default if fonts aren't found)
    try:
        font_main = ImageFont.truetype("/usr/share/fonts/truetype/dejavu/DejaVuSans-Bold.ttf", 120)
        font_sub = ImageFont.truetype("/usr/share/fonts/truetype/dejavu/DejaVuSans.ttf", 40)
        font_tiny = ImageFont.truetype("/usr/share/fonts/truetype/dejavu/DejaVuSans.ttf", 24)
    except:
        font_main = font_sub = font_tiny = ImageFont.load_default()

    # --- Header Section ---
    now = datetime.datetime.now()
    date_str = now.strftime("%A, %b %d")
    time_str = now.strftime("%H:%M")

    draw.text((40, 40), date_str, font=font_sub, fill=0)
    draw.text((40, 100), time_str, font=font_main, fill=0)

    # Horizontal Divider
    draw.line((40, 260, 718, 260), fill=0, width=3)

    # --- Main Content Section ---
    # Example: RPi5 Temperature
    pi_temp = get_rpi_temp()
    draw.text((40, 300), "RPi5 Status", font=font_tiny, fill=0)
    draw.text((40, 340), f"CPU Temp: {pi_temp}", font=font_sub, fill=0)

    # Placeholder for Kindle Battery (You can read this from a file later)
    draw.text((40, 420), "Kindle Status", font=font_tiny, fill=0)
    draw.text((40, 460), "Battery: --%", font=font_sub, fill=0)

    # --- Decorative Bottom Section ---
    draw.line((40, 900, 718, 900), fill=0, width=3)
    draw.text((40, 920), "System Online", font=font_tiny, fill=0)
    draw.text((40, 950), f"Last Sync: {now.strftime('%H:%M:%S')}", font=font_tiny, fill=0)

    # Save absolute path
    img.save("/home/doma/kindle/dashboard.png")
    print(f"Dashboard updated at {now.strftime('%H:%M')}")

if __name__ == "__main__":
    create_dashboard()
Step 5: The Kindle Script (Battery Optimized)
To make the Kindle last for weeks, we use a Deep Sleep cycle. The Kindle wakes up via a hardware alarm, turns on Wi-Fi, grabs the image, and goes back to sleep. This ensures the Wi-Fi chip isn’t draining power while the image is statically displayed on the E-ink screen.
Save this script as dashboard.sh on your Kindle:
#!/bin/sh

# 1. Enable Wi-Fi
# Using the wirelessEnable property verified for firmware 5.12.x
lipc-set-prop com.lab126.cmd wirelessEnable 1

echo "Waking Wi-Fi..."
timer=0
while [ $timer -lt 60 ]; do
    STATE=$(lipc-get-prop com.lab126.wifid cmState)
    if [ "$STATE" = "CONNECTED" ]; then
        echo "Connected!"
        break
    fi
    sleep 2
    timer=$((timer + 2))
done

# Short pause for network stability
sleep 5

# 2. Grab Battery Data
# We strip the % sign to get a clean integer
BATT=$(gasgauge-info -s | tr -d '%')

# 3. Download the image from RPi5
# Replace <YOUR_RPI_IP> with the actual IP of your Raspberry Pi
wget -q -O /tmp/dashboard.png "http://<YOUR_RPI_IP>:8000/dashboard.png?batt=$BATT"

# 4. Turn Wi-Fi OFF immediately to save battery
lipc-set-prop com.lab126.cmd wirelessEnable 0

# 5. Refresh the E-ink Screen
# -f forces a full refresh (black/white flash) to prevent ghosting
eips -f -g /tmp/dashboard.png

# 6. The mechanical buffer
# Crucial: Wait for the physical ink to finish moving before sleeping
sleep 5

# 7. Schedule RTC Wakeup (2 hours / 7200 seconds)
echo 0 > /sys/class/rtc/rtc0/wakealarm
echo "+7200" > /sys/class/rtc/rtc0/wakealarm

# 8. Enter Deep Sleep (Suspend to RAM)
echo "Going to sleep. See you in 2 hours."
echo mem > /sys/power/state
The script above works — but only until it doesn’t. After a few days of real-world use, we hit edge cases: corrupted downloads, lost Wi-Fi connections, a dead gateway route. The Kindle would freeze on a stale image and never recover. So we rewrote both sides to be genuinely reliable.
Part 2: Making It Production-Ready
Here’s what it took to make the dashboard run unattended, 24/7.
The Kindle Sleep Cycle (Rewritten)
The original script was a simple linear sequence: wake up, connect Wi-Fi, download, sleep. The new version is a while true loop with full error recovery at every step:
Wake from RTC alarm
        │
        ▼
  Battery check ──< 5%──► Show low_battery.png, sleep 1h, loop
        │
      ≥ 5%
        │
        ▼
  Wi-Fi ON (wifid)
  Wait up to 60s ──timeout──► Show wifi.png, sleep 2m, loop
        │
    connected
        │
        ▼
  Gateway fix (if missing)
        │
        ▼
  Ping RPi5 (up to 10 attempts) ──all fail──► wifi.png, sleep 2m, loop
        │
      ping OK
        │
        ▼
  wget to /tmp/dashboard.tmp ──fail──► error.png, sleep 2m, loop
        │      validate && mv
      success
        │
        ▼
  eips -f -g /tmp/dashboard.png
  Wi-Fi OFF → set RTC alarm → deep sleep
Every failure path increments an error counter. After 10 consecutive errors, the Kindle reboots itself (sync && sleep 2 && reboot). On success, the counter resets. This handles the rare case where the Kindle’s network stack gets into a bad state that nothing short of a reboot can fix.
Atomic downloads. The image is downloaded to /tmp/dashboard.tmp first. Only after wget exits cleanly and the file is non-empty is it renamed to dashboard.png. This prevents displaying a corrupt or partially downloaded image.
Gateway fix. After waking from deep sleep, the Kindle sometimes loses its default gateway route. The script checks and restores it:
GATEWAY=$(ip route | grep default | grep wlan0 | awk '{print $3}')
if [ -z "$GATEWAY" ]; then
    route add default gw 192.168.100.1
fi
Progressive ping backoff. Before downloading, the script pings the RPi5 up to 10 times with increasing delays (sleep 1, sleep 2, …, sleep 9). After 5 failed pings, it retries wpa_cli reconnect and the gateway fix. This handles the common case where Wi-Fi reports “connected” but the actual link isn’t ready yet.
Battery protection. Battery level is checked immediately after wake, before Wi-Fi is turned on. Below 5%, the script shows a dedicated low-battery image and sleeps for 1 hour instead of attempting network operations.
Note: You’ll notice the Wi-Fi control in Part 1 uses
com.lab126.cmd wirelessEnable, while the production script usescom.lab126.wifid enable. Thewifidproperty talks directly to the Wi-Fi daemon and proved more reliable for our sleep/wake cycle.
Log rotation. On every start, the script trims the log to the last 300 lines:
tail -n 300 "$LOG" > "${LOG}.tmp" 2>/dev/null && mv "${LOG}.tmp" "$LOG"
Autostart via Upstart
The Kindle runs a custom Upstart job that launches the dashboard automatically after boot:
# /etc/upstart/dashboard.conf
description "Kindle Dashboard"
start on started framework
stop on stopping framework
exec /bin/sh /mnt/us/dashboard.sh
Management from the Kindle shell:
start dashboard    # Start
stop dashboard     # Stop
status dashboard   # Check if running
The script sleeps 30 seconds on first start to give the framework time to fully initialize.
The RPi5 Side
Cron + lockfile. The dashboard image is regenerated every 5 minutes via cron. A lockfile (fcntl.flock) prevents overlapping runs since Playwright takes 3–5 seconds:
lock = open("/tmp/render_dashboard.lock", "w")
try:
    fcntl.flock(lock, fcntl.LOCK_EX | fcntl.LOCK_NB)
except IOError:
    print("Another instance is running. Exiting.")
    sys.exit(1)
Flask server. A lightweight Flask app serves the PNG and provides a browser preview at / for debugging:
@app.route("/dashboard.png")
def dashboard():
    return send_file(str(DASHBOARD_PATH), mimetype="image/png")

@app.route("/")
def preview():
    # Shows the PNG centered on a dark background
The Kindle’s wget passes its battery level as a query parameter: http://rpi5:8000/dashboard.png?batt=85. The server logs this to nohup.out, and the rendering pipeline reads the last batt= value to display it on the next refresh.
Remote management. A helper script (kindle-ctl.sh) lets you control the Kindle dashboard from the RPi5:
./kindle-ctl.sh status    # Check if dashboard is running
./kindle-ctl.sh restart   # Restart dashboard on Kindle
./kindle-ctl.sh logs      # Show last 50 log lines
./kindle-ctl.sh ssh       # Open SSH session
Refresh Interval
Normal cycle: ~30 minutes (1780 seconds). On any error: 2 minutes (120 seconds). This means the dashboard recovers quickly from transient issues while sipping minimal power during normal operation.
Part 3: How the Dashboard Is Built
With the reliability sorted out, here’s how the actual dashboard image is generated every 5 minutes on the RPi5.
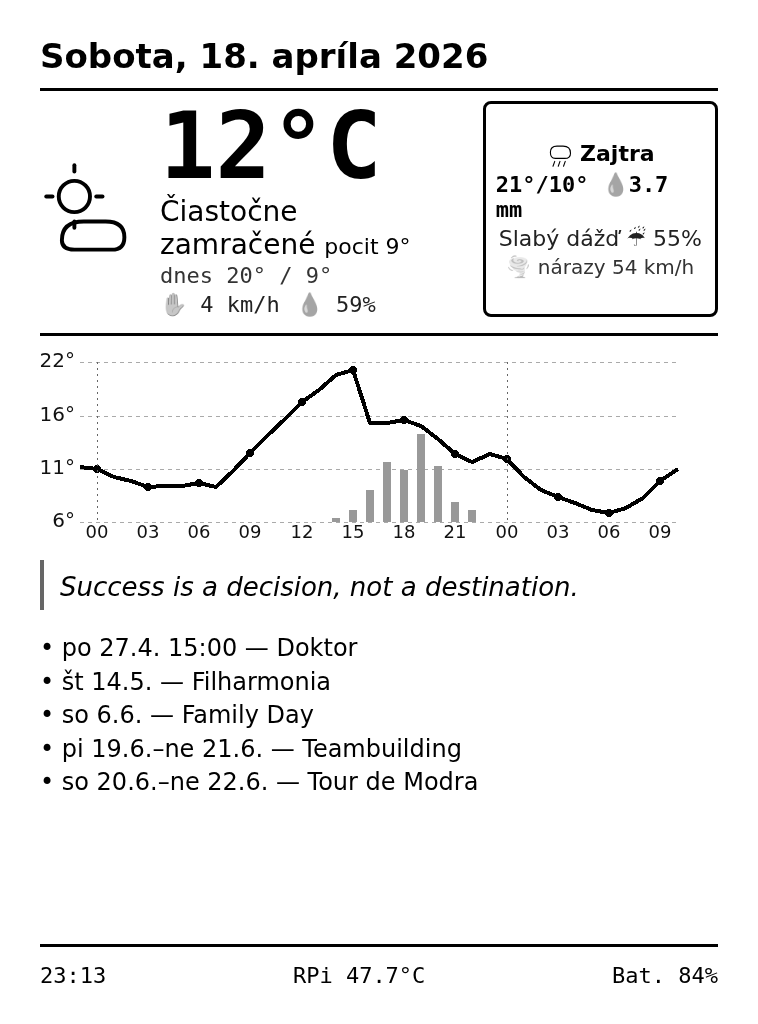
Rendering Pipeline
The original version drew everything directly with Pillow (PIL). This works for simple layouts but becomes unwieldy fast — manually positioning text, drawing dividers, calculating coordinates. The current pipeline uses a real browser instead:
1. Fetch data (weather API, RPi temp, battery, quotes, events)
2. Render Jinja2 HTML template with all data
3. Headless Chromium takes a 758×1024 PNG screenshot
4. Pillow converts to 8-bit grayscale
5. Save → served via Flask → fetched by Kindle
This means the dashboard layout is just HTML and CSS. Flexbox for positioning, SVG for charts and icons, web fonts for typography. Much easier to iterate on than pixel-level drawing commands.
Weather Data (Open-Meteo)
Weather comes from the Open-Meteo API, which is free, requires no API key, and provides excellent forecast data. A single API call fetches:
- Current conditions: temperature, apparent temperature (feels-like), wind speed, humidity, WMO weather code
- Daily forecast (3 days): high/low temperatures, weather code, max precipitation probability, wind gusts, precipitation sum
- Hourly forecast (36 hours): temperature, precipitation probability, weather code — used for the chart
WMO weather codes are mapped to Slovak descriptions (“Jasno”, “Zamračené”, “Slabý dážď”, etc.). If the API call fails, the pipeline retries once after 5 seconds. If both attempts fail, it keeps the last good dashboard image instead of rendering an error state.
The Dashboard Layout
The final layout fits exactly 758×1024 pixels (Kindle Paperwhite 2 resolution):
┌──────────────────────────────────────┐
│  Nedeľa, 13. apríla 2026             │  Date (Slovak, via Babel)
├──────────────────────────────────────┤
│  ☀️  18°C               ┌─────────┐ │
│  Jasno pocit 16°         │ Zajtra  │ │
│  dnes 20° / 9°           │ ☁️ 17/8°│ │
│  🖐 12 km/h  💧 45%      │ Zamrač.│ │
│                          │ 💨42km/h│ │
│                          └─────────┘ │
├──────────────────────────────────────┤
│  36h temperature chart (SVG)         │
│  ─── temp line + precip bars ───     │
├──────────────────────────────────────┤
│  "Small steps every day. Big         │  Random quote
│   results one day."                  │
├──────────────────────────────────────┤
│  • ne 27.4. 15:00 — Zubár            │  Upcoming events
│  • št 14.5. — Filharmonia            │
├──────────────────────────────────────┤
│  14:35  ·  RPi 45°C  ·  Bat. 85%     │  Status bar
└──────────────────────────────────────┘
Date. Formatted in Slovak via Babel: "Nedeľa, 13. apríla 2026". Handles proper declension and capitalization automatically.
Current weather. Large temperature, description, feels-like temperature, daily high/low, wind speed, humidity. Weather icon rendered as inline SVG (see below).
Tomorrow card. A bordered card showing tomorrow’s forecast: high/low, description, precipitation amount, and max wind gusts.
36-hour chart. A pure SVG chart with:
- Temperature polyline (black, with dots every 3 hours)
- Precipitation probability bars (gray)
- Dashed grid lines for temperature scale
- Dotted vertical line at midnight to separate days
- Hour labels every 3 hours
shape-rendering="crispEdges"for clean e-ink rendering
Quote. A random quote from a curated list of 50 motivational quotes (Slovak and English), displayed in italics with a left border.
Events. Upcoming events from a simple text file (YYYY-MM-DD|description), filtered to future dates only, sorted chronologically, capped at 5 displayed.
Status bar. Pinned to the bottom: sync time, RPi5 CPU temperature, Kindle battery percentage.
Custom SVG Weather Icons
Instead of relying on emoji (which render inconsistently across browsers and may not survive the grayscale conversion well), the dashboard uses hand-drawn SVG line-art icons. Each weather condition has its own symbol:
- Clear sky: circle with radiating lines (sun)
- Partly cloudy: sun peeking behind a cloud
- Overcast: layered cloud shapes
- Rain: cloud with angled lines below
- Snow: cloud with dots below
- Thunderstorm: cloud with a zigzag lightning bolt
- Fog: dashed cloud outline with horizontal lines
All icons are defined as <symbol> elements in a hidden SVG block and referenced via <use href="#icon-id">. Black strokes on transparent background — perfect for e-ink.
E-Ink CSS Considerations
The HTML template is specifically optimized for e-ink display:
-webkit-font-smoothing: none;       /* No anti-aliasing — cleaner e-ink pixels */
-moz-osx-font-smoothing: grayscale;
color: black;                        /* Pure black text only */
shape-rendering: crispEdges;         /* Sharp SVG lines */
No grays (except for chart bars and secondary text), no colors, no gradients. The final Pillow step (img.convert('L')) converts to 8-bit grayscale, but keeping the source as black-and-white as possible gives the sharpest result on the e-ink panel.
Credits & Inspiration
This project didn’t emerge from a vacuum — we stood on the shoulders of several excellent open-source Kindle dashboard projects:
| Project | What we took from it |
|---|---|
| terminalbytes/kindle-dashboard | Main visual influence — large temperature as the hero element, monospace for numbers, bordered “Tomorrow” card, status bar (blog post) |
| mt-empty/pi-inky-weather-epd | SVG weather icons instead of emoji (the pattern for our inline <symbol> icons), darker tones for e-ink readability |
| dennisreimann/kindle-display | Clean newspaper-style layout, strong typographic hierarchy |
| davidhampgonsalves/Life-Dashboard | Quote section with blockquote styling, multi-section layout concept |
| sibbl/hass-lovelace-kindle-4 | Error recovery — ping test, wpa_cli reconnect, gateway fix, error images, auto-reboot after repeated failures |
Final Thoughts
The dashboard has been running unattended for weeks now. The Kindle wakes up every 30 minutes, grabs the latest image, and goes back to sleep. Battery lasts about 2–3 weeks between charges. The RPi5 keeps the image fresh every 5 minutes with weather, quotes, and upcoming events. It’s become genuinely useful — a glanceable information display that costs nothing to run and nothing to build if you have the hardware already.