WiFi Access Point Bridge with Raspberry Pi 3 – ETH to WLAN
A Raspberry Pi WiFi Extender is a cheap and power efficient way of increasing the total range of your WiFi Network. In my case I needed to extend a WiFi coverage within the same LAN (bridge mode from Ethernet to WiFi).
I have found a working shortcut 😎 to create an access point following a GitHub project so I didn’t need to follow instructions from raspberrypi.org page – Using the Raspberry Pi as an access point to share an internet connection (bridge).
So let’s start to create an access point with an Internet connection sharing from you RaspBerry Pi 3. All you need to do is to follow these two steps:
- Clone and compile the create_ap tool:
git clone https://github.com/oblique/create_ap
cd create_ap
sudo make install
create_ap --help
❓ You need the following basic tools: sudo apt-get install git make
- Run the command that creates access point that bridge internet from the ethernet cable to WiFi:
sudo create_ap -m bridge wlan0 eth0 MyAccessPointSSID MyPassPhrase
By using your existing access point SSID name and WPA passphrase, the WiFi network will be extended and clients will automatically connects to your new WiFi access point on Raspberry Pi 3 Model B.
❓ If you get an error, that WiFi is already in use, just close it by:sudo ifconfig wlan0 down
To auto-start WiFi access point at system start: sudo systemctl enable create_ap and modify the configuration file /etc/create_ap.conf
Do not forget to disable WiFi client auto-start by modifying /etc/network/interfaces<br />

Check the WiFi status with commands: iw wlan0 info or iwconfig
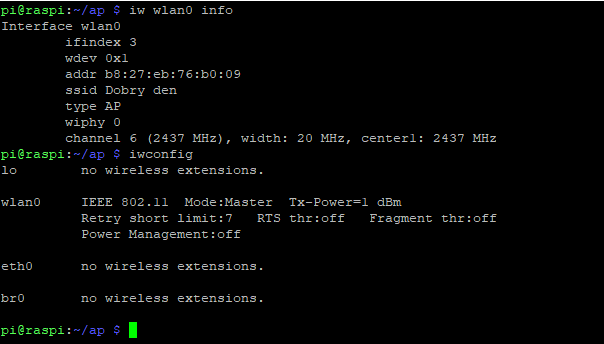
The configuration file for the create_ap service used in my working scenario:
pi@raspi:~ $ cat /etc/create_ap.conf
CHANNEL=6
GATEWAY=192.168.12.1
WPA_VERSION=2
ETC_HOSTS=0
DHCP_DNS=gateway
NO_DNS=0
NO_DNSMASQ=0
HIDDEN=0
MAC_FILTER=0
MAC_FILTER_ACCEPT=/etc/hostapd/hostapd.accept
ISOLATE_CLIENTS=0
SHARE_METHOD=bridge
IEEE80211N=0
IEEE80211AC=0
HT_CAPAB=[HT40+]
VHT_CAPAB=
DRIVER=nl80211
NO_VIRT=1
COUNTRY=SK
FREQ_BAND=2.4
NEW_MACADDR=
DAEMONIZE=0
NO_HAVEGED=0
WIFI_IFACE=wlan0
INTERNET_IFACE=eth0
SSID=MYSSID_CHAGE_IT
PASSPHRASE=MYPASSPHRASE_CHAGE_IT
USE_PSK=0
The version of Rasbian used for the working access point: $ lsb_release -a is: Raspbian GNU/Linux 8.0 (jessie)
On version Stretch Lite I need to install: sudo apt-get install git hostapd haveged
By reading interesting source describing WiFi power tuning, I have decreased ( 😯 yes, decreased… ) the power by playing with the command iwconfig <device> txpower <txpower in dBm>.
Check the temperature of your Raspberry PI: watch /opt/vc/bin/vcgencmd measure_temp Mine is temp=49.4'C which is well under 80C, so the overheating should not be any problem (even without heatsinks).
Next chapters describes various scenarios of WiFi modes.
Scenarios of WiFi Modes
This chapter describes why have I decided to create an access point from Raspberry Pi 3.
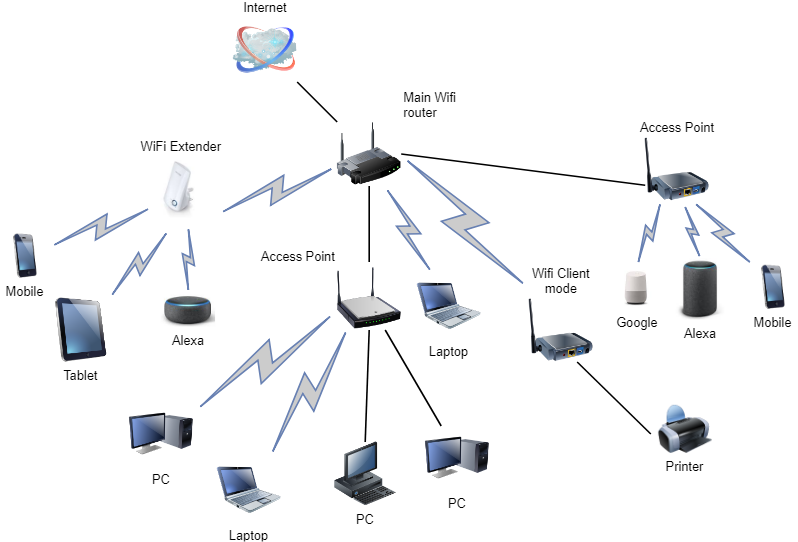
You have three main situations in regards of infrastructure connection:
- Ethernet port (RJ45) IS NOT available and you need WiFi extender to cover more area with WiFi signal
- Ethernet port (RJ45) IS NOT available and you need WiFi client mode to connect some devices not capable of WiFi (TV, printer,..)
- Ethernet port (RJ45) IS available in a not WiFi covered room and you need to extend WiFi coverage by WiFi Access Point. In this situation you have 3 more options of Internet sharing:
- None – the Internet connection is not shared to Wifi clients and is available only to the Access Point.
- NAT (Network address translation) – new LAN segment is created with separate DHCP server and
- Bridge – You can create an AP with the same interface you are getting your Internet connection (same LAN segment so the devices will see each other and will get IP from the main router).
Check this NAT vs Bridge explanation to understand a difference between NAT and Bridge in more detail. The main difference between WiFi extender and WiFi access point is that WiFi access point is getting its network connection from Ethernet, WiFi extender gets its network connection from a WiFi adapter.
Brief explanation of WiFi router modes is explained in next chapters.
WiFi Router Default Mode

This is the default mode and the first option if you are not currently using any wired/wireless routers. WiFi router connects to the Internet provider via some protocol (PPPoE, DHCP, PPTP, L2TP, or Static IP) and shares internet to the wireless/wired LAN clients or devices. In this mode, NAT, firewall, and DHCP server are usually enabled.
WiFi Client Mode

A Client Mode router connects to a wireless Access Point (usually the primary gateway router). It uses its wireless connection as the WAN interface, and shares the internet connection only to the LAN ports. There are many sources that you can find on google that covers this topic. There is no need to create another source that copy/paste others… 😉 In general, be aware of 2 types of internet sharing: bridge mode and NAT mode.
WiFi Extender (Repeater) Mode

In Extender (repeater) mode, Raspberry 3 Pi wireless connects to an existing wireless network to extend the wireless coverage. In this mode, the firewall, IP sharing, and NAT functions are disabled. Again find some of many google sources that covers this mode with step by step instructions (e.g. tutorial with WiFi dongle).
WiFi Access Point Mode

Similar to main WiFi router, with the only one exception, i.e. the Internet is provided directly with WAN port. As stated at the beginning of this post, just follow instructions from raspberrypi.org if you like the longer way.