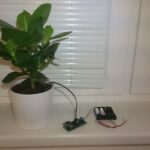
Idea for this project came with my new small fish tank. Since the fish tank is in a living room I did not want to have aquarium air pump on during the TV time due to its noise. Also the main light should be automatically turned off during the night. I wanted to add also night LED.

If you like these pictures, you can check some videos of the fish tank in the last page of this post.
To sum up, the fish tank DIY project should cover following areas:
- accessible wirelessly via WIFI
- 24/7 HTTP server for easy integration via HTTP GET
- ON/OFF switch for main fish tank light (~220 V)
- ON/OFF switch for aquarium air pump (~220 V)
- NeoPixel LED stick (5V). Send RGB levels to combine any color and brightness
The idea is to implement simple HTTP server to be able to send a command via web browser or simple Linux wget.
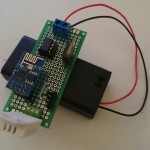
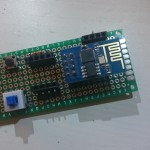
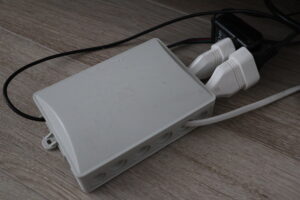
HW parts
Total sum of HW is about 30EUR plus cables and box, not a big deal.. 😉
The HW that I used:
- NodeMCU – hardware which is based on the ESP-12 module – NodeMCU wiki
- NeoPixel Stick – 8 x WS2812 5050 RGB LED – SparkFun product
- HL-52S 2 channel relay module – Sainsmart relay
- 220V cable and female plugs
- 3 wire cable for NeoPixel
- small case to cover high voltage ralley
- 5V USB power supply
Software
Complete code that I created/combined is posted as Gitlab code snipped. Main parts are described in the following sub chapters.
WIFI
Wifi is configured with a static IP so the address is known and not changed after nodemcu reboot. You can also configure it in a router.
Wifi initialization:
const char* ssid     = SSID_OF_YOUR_WIFI;
const char* password = PASSWD_OF_YOUR_WIFI;
IPAddress ip(192, 168, 1, 225);    //Node static IP
IPAddress gateway(192, 168, 1, 1);  //Node static gateway
IPAddress subnet(255, 255, 255, 0);  //Node static subnet
Wifi setup:
WiFi.mode(WIFI_STA);
WiFi.begin(ssid, password);
WiFi.config(ip, gateway, subnet);
// Wait for connection
while (WiFi.status() != WL_CONNECTED) {
delay(500);
Serial.print(".");
}
Serial.println("");
Serial.print("Connected to ");
Serial.println(ssid);
Serial.print("IP address: ");
Serial.println(WiFi.localIP());
HTTP server
HTTP server configuration on port 80:
ESP8266WebServer server(80);
HTTP server setup:
server.on("/", handleRoot);
server.on("/leds", handleLeds);
server.on("/pin", handlePin);
server.onNotFound(handleNotFound);
server.begin();
Serial.println("HTTP server started");
NeoPixel strip
NeoPixel strip is initialization:
#define PIN    15
#define N_LEDS 8
Adafruit_NeoPixel strip = Adafruit_NeoPixel(N_LEDS, PIN, NEO_GRB + NEO_KHZ800);
NeoPixel setup:
strip.begin();
for (uint16_t i = 0; i < strip.numPixels(); i++)
{
strip.setPixelColor(i, 0, 0, 0);
strip.setBrightness(64);
}
strip.show();
2-channel relay
Relay setup:
pinMode(4, OUTPUT); // PIN
pinMode(5, OUTPUT); // PIN
digitalWrite(4, 1); // MAIN LIGHT ON
digitalWrite(5, 1); // Bubles OFF
Compelete DIY fish tank project

You can see the result on the next page…